
You’ve decided you want to try wood carving. Maybe you’ve admired hand-carved spoons, simple animals, or elegant relief panels. Maybe you’ve watched a few tutorials and felt that quiet pull of curiosity. But now you’re staring at a screen full of tool recommendations, wood types, and conflicting advice — and you have no idea where to actually begin.
This beginner’s guide to wood carving exists to solve exactly that problem. In the next few minutes, you’ll learn precisely which tools you need (and which you don’t), which woods to choose, how to hold a knife without cutting yourself, and how to finish your first piece so it looks genuinely professional. No fluff. No overwhelming tool lists. Just the essentials, in the order you actually need them.
Let’s get you carving.
1. Wood Carving 101: What You Actually Need to Start
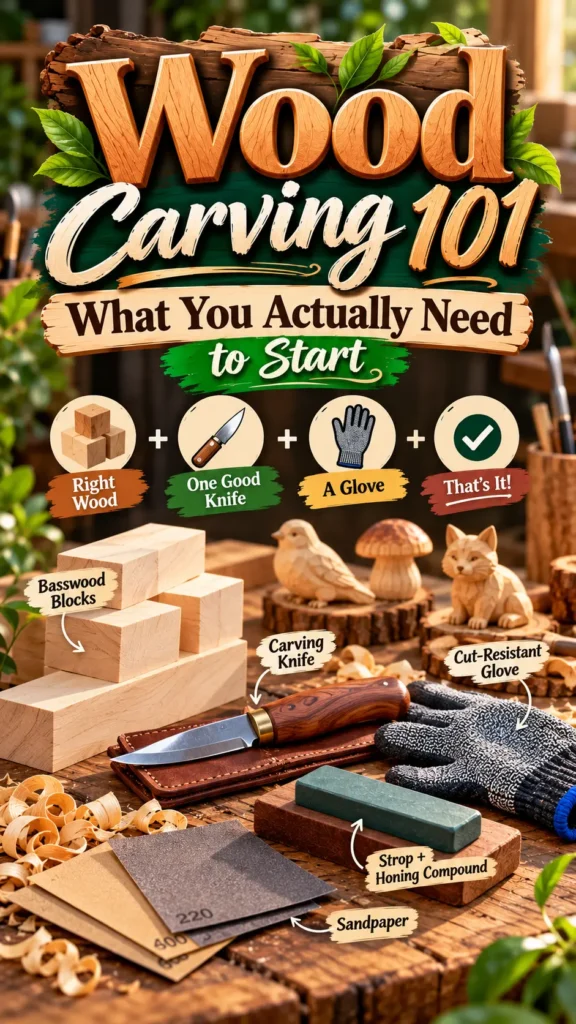
Wood carving 101 starts with three things and nothing else: the right wood, one good knife, and a glove. Everything else can wait.
Your complete beginner toolkit:
| Item | Why It Matters | Approx. Cost |
|---|---|---|
| Basswood blocks (1×1×3 inches, 5-pack) | Soft, straight-grained, nearly splinter-free — the friendliest beginner wood | $10–15 |
| Carving knife (Mora 120 or Flexcut KN12) | One sharp fixed-blade knife beats a drawer of dull ones | $25–35 |
| Cut-resistant glove (Level 5) | Protects the hand holding the wood — never skip this | $10–15 |
| Strop + honing compound | Keeps your blade razor-sharp with 30-second touch-ups | $15–20 |
| Sandpaper (220, 400, 600 grit) | Turns a rough carving into a silky, professional piece | $5–8 |
Total: Under $70.
What to avoid on day one:
- A 20-piece gouge set — you won’t use most of them yet, and cheap tools disappoint
- Power tools — hand carving teaches you control that power tools can’t
- Hardwoods like oak and maple — they’ll frustrate you and dull your knife fast
- Construction lumber — treated with chemicals and full of sap
The one purchase that matters most: Your knife. Buy one good carving knife rather than a cheap set of five. A sharp, well-made blade will do 90% of everything you need for your first year of carving.
Worthy tip: “Your entire beginner setup costs less than a nice dinner out. The only real barrier to starting is deciding to start.”
For beginner project ideas to use with your new tools, explore our related article: First Wood Carving Ideas That Spark a Lifelong Hobby (Mid to High Net Worth)
2. Wood Carving for Beginners: Choosing the Right Wood
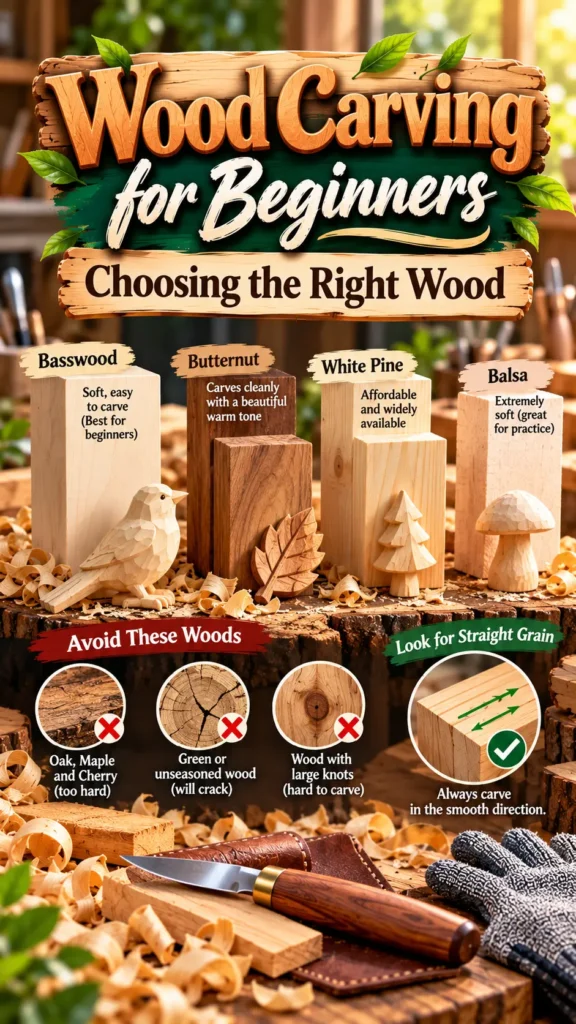
Wood carving for beginners succeeds or fails on the wood you choose. Get this right, and everything else becomes easier.
The best woods for beginners:
Basswood — The gold standard. Soft but not crumbly. Straight, tight grain with no sudden direction changes. Pale enough that pencil lines show up clearly. Inexpensive enough that mistakes don’t sting. If you carve only one wood for your first year, make it basswood.
Butternut — Slightly harder than basswood, with a warm chocolate-brown tone that resembles walnut at half the price. Carves cleanly and finishes beautifully.
White pine — Cheap and widely available. Choose clear, knot-free pieces. Best for practice and large rough shapes rather than detailed work.
Balsa — Extremely soft — like carving foam. Excellent for building muscle memory, too fragile for keepsake pieces.
What to avoid:
- Oak, maple, and cherry — too hard for beginners; you’ll fight the wood instead of learning
- Green or unseasoned wood — will crack and warp as it dries
- Wood with large knots — knots are much harder than surrounding wood and will deflect your knife
How to read the grain:
Look at the side of your wood block. You’ll see long, parallel lines — the grain. Run your finger along them. One direction feels smooth; the other feels rough. Always carve in the smooth direction. Carving against the grain causes tear-out, where the wood splinters instead of slicing cleanly.
Where to buy: Craft stores (Michaels, Hobby Lobby), online (Amazon, Woodcraft, Bell Forest Products), or a local specialty lumberyard.
Worthy tip: “Buy a five-pack of basswood blocks, not one. Having extras removes the fear of mistakes — and that freedom makes you braver.”
You Might Like : First Wood Carving Ideas That Spark a Lifelong Hobby
3. The Three Essential Cuts Every Beginner Must Master
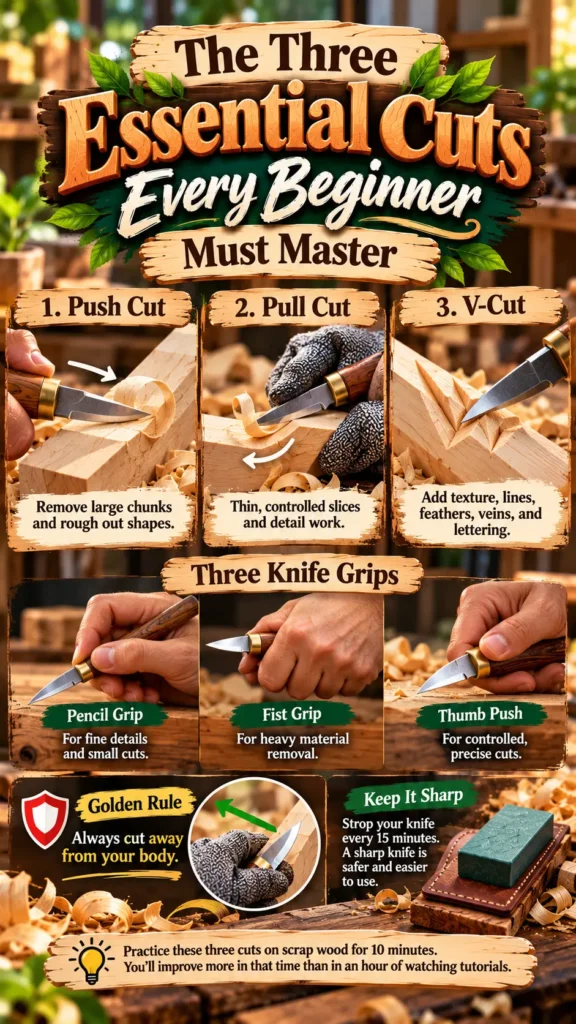
Wood carving basics for beginners come down to three fundamental cuts. Practice these on scrap wood before attempting a project — ten minutes of deliberate practice will improve your first piece more than an hour of impatient carving.
The Push Cut
- Hold the knife firmly. Place the blade at a shallow angle — about 30 degrees — against the wood.
- Push forward with your thumb or shoulder.
- Best for: removing large chunks and roughing out shapes.
The Pull Cut (Whittling Cut)
- Hold the wood in your gloved hand. Pull the knife toward you — but never toward your body.
- Use your thumb as a lever for control.
- Best for: thin, controlled slices and detail work.
The V-Cut
- Make two angled cuts meeting at the bottom, forming a V-shaped groove.
- Best for: adding texture, lines, feathers, veins, and lettering.
The three knife grips:
- Pencil grip — for fine details and small cuts
- Fist grip — for heavy material removal
- Thumb push — for controlled, precise cuts
The golden rule — memorize this: Always cut away from your body. If you can imagine the blade slipping and cutting you, change your grip or direction. No exceptions, no matter how small the cut.
Why sharpness is a safety issue: A sharp knife slices cleanly with light pressure. A dull knife requires force — and force leads to slips. Strop your knife every 15 minutes. It takes 30 seconds and prevents most beginner injuries.
Worthy tip: “Practice these three cuts on scrap wood for 10 minutes. You’ll improve more in that time than in an hour of watching tutorials.”
4. Setting Up Your Beginner Workspace
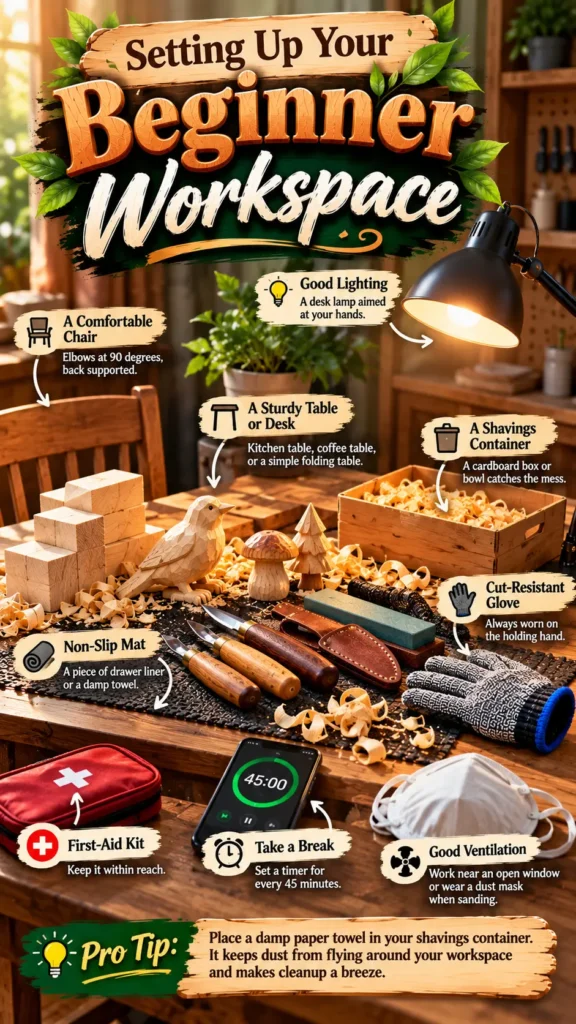
Getting started with wood carving doesn’t require a workshop. A corner of your kitchen table works perfectly. What matters is the setup.
What you need:
- A sturdy table or desk — kitchen table, coffee table, or a simple folding table
- Good lighting — a desk lamp aimed directly at your hands. Shadows hide detail and make carving harder.
- A non-slip mat — a piece of drawer liner or a damp towel keeps the wood from sliding
- A shavings container — a cardboard box or bowl catches the mess
- A comfortable chair — elbows at 90 degrees, back supported
Safety essentials within reach:
- Cut-resistant glove (always worn on the holding hand)
- First-aid kit
- A timer or phone reminder to take a break every 45 minutes
Ventilation matters: If you’re sanding, work near an open window or wear a dust mask. Wood dust is fine and can irritate your lungs over time.
The lighting secret: Position your lamp so light rakes across the carving surface rather than shining straight down. This reveals the form and helps you see where to cut next — the same technique photographers use to show texture.
Portability bonus: Whittling is one of the few crafts you can do anywhere. A porch, a park bench, a campsite, a hotel room. Your entire kit fits in a small pouch.
Worthy tip: “Place a damp paper towel in your shavings container. It keeps dust from flying around your workspace and makes cleanup a breeze.”
5. Your First Carving: A Step-by-Step Beginner Tutorial
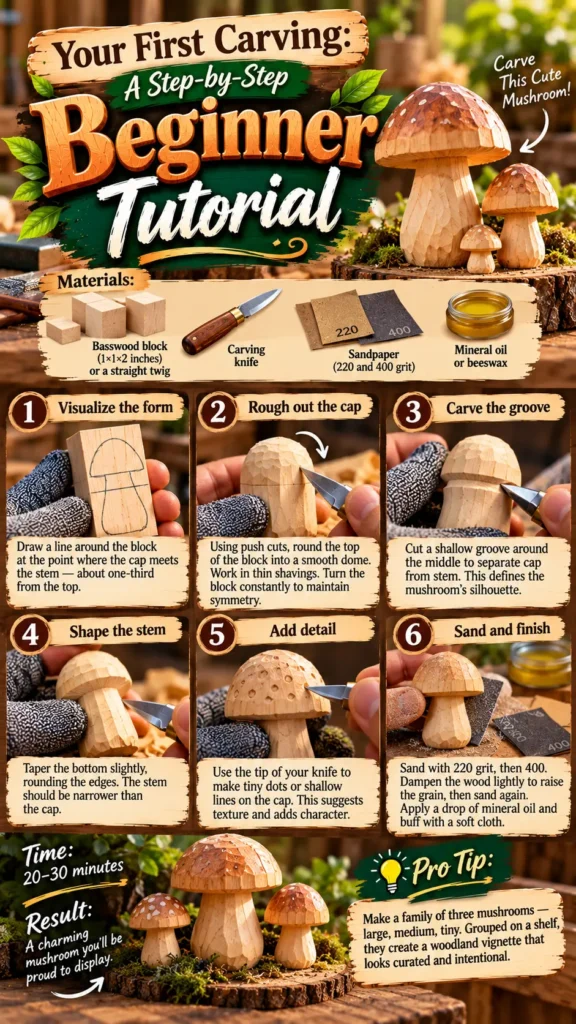
Beginner wood carving tutorial — let’s put everything together. Your first project should be small, simple, and nearly impossible to ruin. The wooden mushroom is the classic choice.
Materials:
- Basswood block (1×1×2 inches) or a straight twig from the garden
- Carving knife
- Sandpaper (220 and 400 grit)
- Mineral oil or beeswax
Step 1: Visualize the form
A mushroom is a dome on a stem. Draw a line around the block at the point where the cap meets the stem — about one-third from the top.
Step 2: Rough out the cap
Using push cuts, round the top of the block into a smooth dome. Work in thin shavings. Turn the block constantly to maintain symmetry.
Step 3: Carve the groove
Cut a shallow groove around the middle to separate cap from stem. This defines the mushroom’s silhouette.
Step 4: Shape the stem
Taper the bottom slightly, rounding the edges. The stem should be narrower than the cap.
Step 5: Add detail
Use the tip of your knife to make tiny dots or shallow lines on the cap. This suggests texture and adds character.
Step 6: Sand and finish
Sand with 220 grit, then 400. Dampen the wood lightly to raise the grain, then sand again. Apply a drop of mineral oil and buff with a soft cloth.
Time: 20–30 minutes. Result: A charming mushroom you’ll be proud to display.
What to do if you make a mistake: Keep going. Most beginner “mistakes” disappear in sanding, or become part of the piece’s character. Wood is forgiving — a slightly lopsided mushroom still looks like a mushroom.
Worthy tip: “Make a family of three mushrooms — large, medium, tiny. Grouped on a shelf, they create a woodland vignette that looks curated and intentional.”
6. Finishing Your Work: The Step That Makes Beginners Look Professional
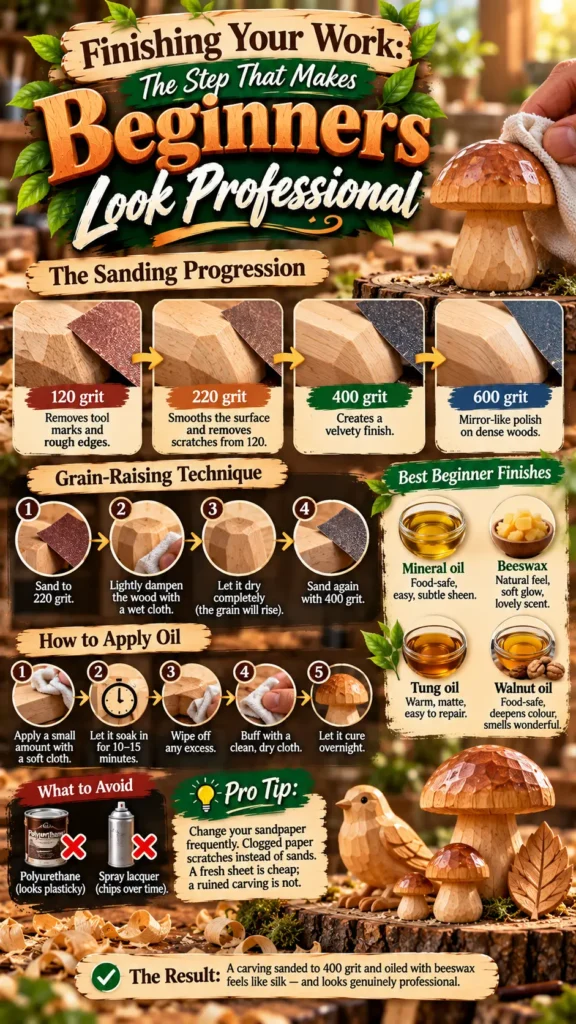
Wood carving fundamentals include one step that beginners consistently underestimate: finishing. Sanding and oiling are what separate handmade from homemade.
The sanding progression:
- 120 grit — removes tool marks and rough edges
- 220 grit — smooths the surface and removes scratches from 120
- 400 grit — creates a velvety finish
- 600 grit — mirror-like polish on dense woods
The grain-raising technique:
- Sand to 220 grit
- Lightly dampen the wood with a wet cloth
- Let it dry completely — the grain will rise
- Sand again with 400 grit
This removes the fuzzy “whiskers” that rise when wood gets wet — the same whiskers that would otherwise appear when you apply finish.
The best beginner finishes:
- Mineral oil — food-safe, easy, subtle sheen
- Beeswax — natural feel, soft glow, lovely scent
- Tung oil — warm, matte, easy to repair
- Walnut oil — food-safe, deepens colour, smells wonderful
What to avoid: Polyurethane (looks plasticky) and spray lacquer (chips over time).
How to apply oil:
- Apply a small amount with a soft cloth
- Let it soak in for 10–15 minutes
- Wipe off any excess
- Buff with a clean, dry cloth
- Let it cure overnight
The difference it makes: A carving sanded to 400 grit and oiled with beeswax feels like silk. That tactile quality is what transforms a beginner’s project into something genuinely beautiful.
Worthy tip: “Change your sandpaper frequently. Clogged paper scratches instead of sands. A fresh sheet is cheap; a ruined carving is not.”
7. Common Beginner Mistakes and How to Avoid Them
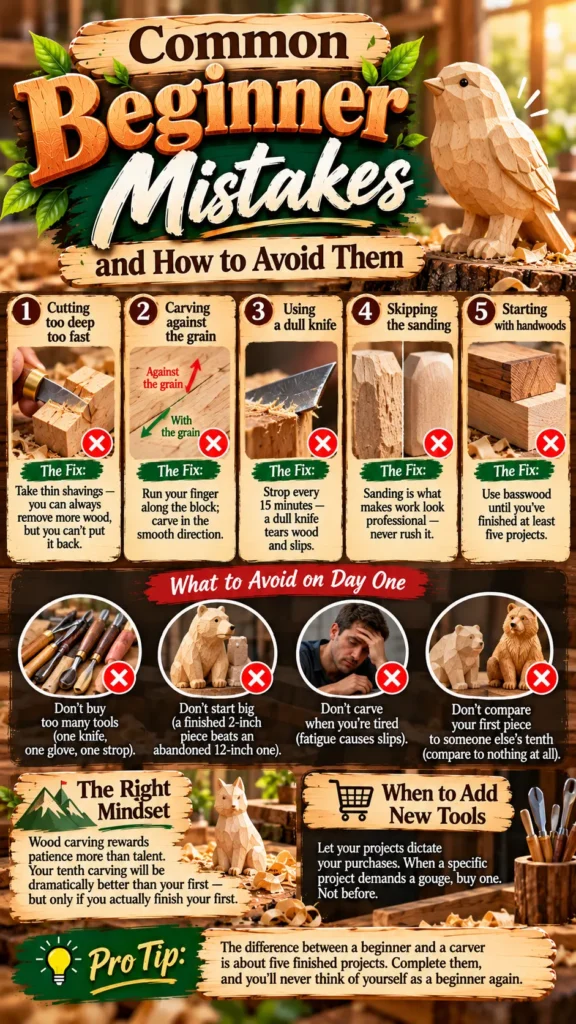
Wood carving for absolute beginners involves a learning curve. Here are the mistakes almost everyone makes — and the fixes that keep you moving forward.
The five most common beginner mistakes:
| Mistake | The Fix |
|---|---|
| Cutting too deep too fast | Take thin shavings — you can always remove more wood, but you can’t put it back |
| Carving against the grain | Run your finger along the block; carve in the smooth direction |
| Using a dull knife | Strop every 15 minutes — a dull knife tears wood and slips |
| Skipping the sanding | Sanding is what makes work look professional — never rush it |
| Starting with hardwoods | Use basswood until you’ve finished at least five projects |
What to avoid on day one:
- Don’t buy too many tools — one knife, one glove, one strop
- Don’t start big — a finished 2-inch piece beats an abandoned 12-inch one
- Don’t carve when you’re tired — fatigue causes slips, and slips cause injuries
- Don’t compare your first piece to someone else’s tenth — compare it to nothing at all
The mindset that sustains the hobby: Wood carving rewards patience more than talent. Your tenth carving will be dramatically better than your first — but only if you actually finish your first.
When to add new tools: Let your projects dictate your purchases. When a specific project demands a gouge, buy one. Not before.
Worthy tip: “The difference between a beginner and a carver is about five finished projects. Complete them, and you’ll never think of yourself as a beginner again.”
From First Cut to Finished Masterpiece
You now have a complete beginner’s guide to wood carving: tools, tips, and results. From the essential toolkit under $70 to choosing the right wood, from the three fundamental cuts to setting up a home workspace, from a step-by-step mushroom tutorial to finishing techniques that make beginners look professional — you have everything you need to start.
Key takeaways:
- Start with basswood — soft, forgiving, and inexpensive
- One good knife — not a set of cheap ones
- Wear the glove — always
- Cut away from your body — the only rule that really matters
- Sand progressively — 120, 220, 400, and 600 grit
- Oil and buff — finishing is what makes work look professional
- Finish what you start — completed simple pieces teach more than abandoned ambitious ones
Simple first carving projects to try:
- Wooden mushroom — 20 minutes
- Heart pendant — 20 minutes
- Wooden bead — 15 minutes
- Six-cut mouse — 45 minutes
- Simple leaf relief — 1 hour
Essential wood carving guide — the short version: Buy basswood, buy one good knife, wear a glove, cut away from your body, take thin shavings, sand to 400 grit, oil with beeswax, and finish what you start.
That’s it. That’s the whole guide. Everything else is refinement.
Table of Contents
Call to Action (CTA)
Are you ready to make your first cut? I’d love to hear what you’re planning to carve. Email me at admin@woodzaa.com with “Beginner’s Guide” in the subject line. Tell me which project caught your eye — a mushroom, a heart pendant, or a simple animal — and I’ll send you a free printable pattern to get you started.
And when you finish your first carving, send a photo. I feature beginner work on my Pinterest page because those first pieces are the ones that matter most. They’re where every carver’s story begins.
Now go make some shavings.
— Sheila

